又一次 frp 反代记录 & SSL 证书签发心得
SSL 证书签发心得
参考:
使用 frp 内网穿透 - 珅鸟玄's Blog (sheniao.top)
- 目的和本篇类似,都是使用 frp 进行内网穿透,但是具体写了 frp 的使用方法,具体内容上比本篇详细,然而文章结构上不可避免的不如本篇清晰。建议对照参考。
恢复网站 - 珅鸟玄's Blog (sheniao.top)
- 目的和本篇不同,但是使用了 acme.sh 实现了自动签发和续签,比前篇中的方法更方便。
重要参考:
- 用 acme.sh 帮你免费且自动更新的 HTTPS 证书,省时又省力 - 知乎 (zhihu.com)
- 如何在 Ubuntu 22.04 上安装、配置、使用 Nginx?_ubuntu22.04 安装 nginx-CSDN 博客
有上面两次给网站配置 SSL 证书和配置 Nginx 的经验,使我对一些常见的步骤有了整体上的了解。
首先是签发证书的 CA(证书颁发机构),有 Let's Encrypt 和 ZeroSSL。
其次是申请签发证书的工具,有 Certbot 和 acme.sh。
然后是签发过程中需要的验证方式(验证域名控制权),一种是 HTTP 验证,一种是 DNS 验证。
HTTP 验证
- Webroot mode:已经有网站的情况
- Apache / Nginx mode:已经有 Apache / Nginx 服务器的情况
- Standalone mode:没有服务器的情况
DNS 验证,不需要任何服务器,不需要任何公网 IP,且可使用泛域名配置(HTTP 验证不行)
- DNS API mode:特点自动!
- DNS manual mode:手动,且不能自动续期。
- DNS alias mode
我们再回到之前写的两篇文章,来分析当初使用的方法,以及使用什么方法比较合适。
使用 frp 内网穿透 - 珅鸟玄's Blog (sheniao.top)
- 这一篇中,使用了 Certbot 的 DNS manual mode,比较原始,也比较麻烦。
- 分析理由:因为没有 Nginx 服务器,所以不能使用 HTTP 验证的 Webroot mode 和 Apache / Nginx mode;但是应该是可以使用 Standalone mode 和 DNS API mode 的。
恢复网站 - 珅鸟玄's Blog (sheniao.top)
- 这一篇中,使用了 acme.sh 的 Webroot mode。
- 分析理由:因为使用了云服务商提供的预设的 Typecho 镜像,其中包含了 Nginx 的服务器;但是也应该是可以使用更好的 DNS API mode 的。
- 本篇中的情况和第一篇相同,但是采用了 Standalone mode。
- 最后,我认为应该摆脱对云服务商提供的预设镜像的依赖,尝试构建整个流程,并使用目前最方便的 DNS API mode 方法来签发证书。这是我将来需要去完成的。
本文脉络
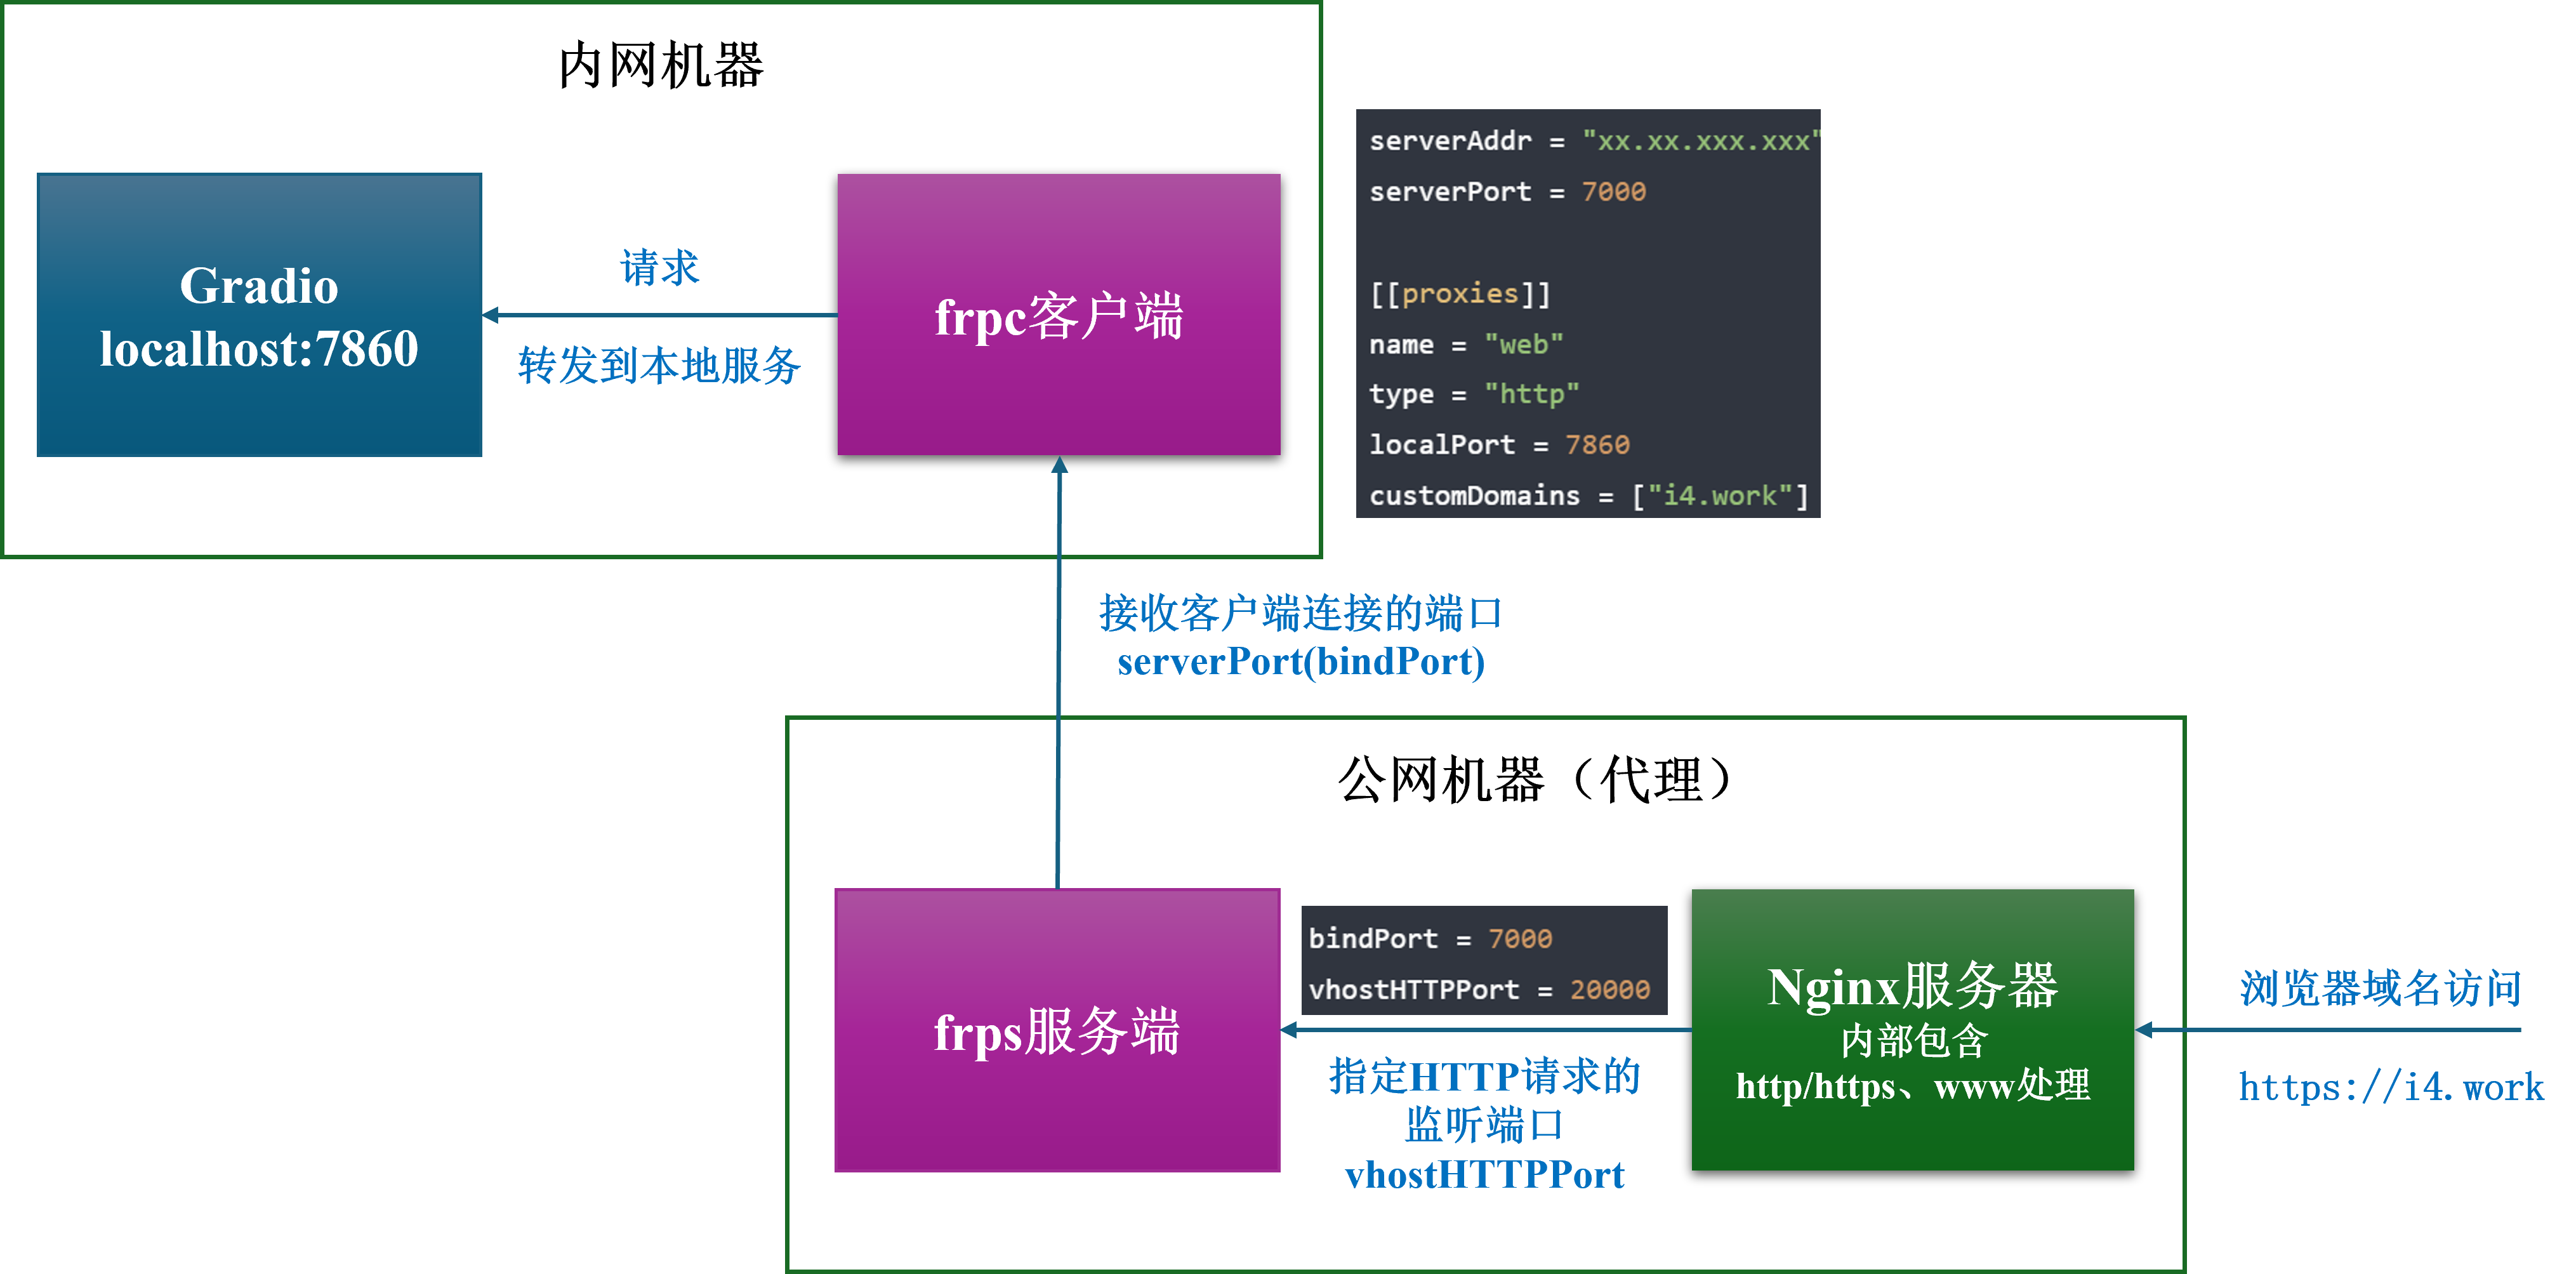
在前篇中有一个比较好的图,放在这里提示一下整个文章的脉络。

SSL 证书只是为了实现 HTTPS 安全访问的一个工具。整体最关键的是 frp,要清楚是如何运行的。
SSL 证书配置
准备公网 IP 和解析好的域名的服务器(略)
安装 SSL 证书
# 设置解析域名

# 常规更新
sudo apt update
sudo apt upgrade -y

# 使用 acme.sh 签发 SSL 证书
## 安装 acme.sh
curl https://get.acme.sh | sh
source ~/.bashrc
acme.sh -h
## (可选)更换 CA
acme.sh --set-default-ca --server letsencrypt
## 注册账号
acme.sh --register-account -m shirou-emiya2002@outlook.com
## HTTP 验证 - Standalone mode
sudo apt install socat -y
# acme.sh --issue -d i4.work --standalone # 单域名签发,且如启动了 Nginx 需要先关闭
# acme.sh --issue -d i4.work --standalone -d www.i4.work # 多域名配置
acme.sh --issue -d i4.work --standalone -d www.i4.work --keylength ec-256 # 签发 ECC 证书

# 查看自动更新证书配置
## 查看 acme.sh 自动更新任务
crontab -l

# 强制更新
acme.sh --renew -d example.com --force
acme.sh --renew -d example.com --force --ecc  # 如果用的是ECC证书

# 停止更新
acme.sh --list # 查看证书列表
acme.sh --remove -d example.com [--ecc] # 停止 Renew,然后手动把目录下的证书移除
Nginx 设置
安装 Nginx:
sudo apt install nginx -y # 本次是基于 ubuntu 22.04,没有 Nginx
sudo systemctl start nginx # 启动 Nginx 服务
sudo systemctl enable nginx # 确保 Nginx 在系统启动时自动启动
mkdir /etc/nginx/ssl/ # 记得创建 ssl 目录
将证书复制到 Nginx 目录下:
# 安装(复制)证书
acme.sh --installcert -d i4.work \
--key-file   /etc/nginx/ssl/i4.work.key \
--fullchain-file /etc/nginx/ssl/i4.work.fullchain.cer \
--reloadcmd  "service nginx force-reload"

# 生成 dhparam.pem 文件(可选)
openssl dhparam -out /etc/nginx/ssl/dhparam.pem 2048

# Nginx SSL 相关配置
## 修改 Nginx 的 conf 配置文件,加入 SSL 相关配置,见下
## 修改完后,重载 nginx
nginx -t
systemctl reload nginx # 比起 restart,reload 更好些
Nginx 反代 + HTTPS 设置,可直接放在 /etc/nginx/nginx.conf 里,也可以放在 /etc/nginx/conf.d 目录中。推荐后一种。
sudo vim /etc/nginx/conf.d/i4.work.conf写入:
server {
    listen 80;
    listen [::]:80;
    listen 443 ssl http2 default_server; # IPv4
    listen [::]:443 ssl http2 default_server; # IPv6
    server_name i4.work www.i4.work;

    ssl_certificate /etc/nginx/ssl/i4.work.fullchain.cer;
    ssl_certificate_key /etc/nginx/ssl/i4.work.key;
    ssl_dhparam /etc/nginx/ssl/dhparam.pem;
    ssl_protocols TLSv1 TLSv1.1 TLSv1.2;
    ssl_ciphers HIGH:!aNULL:!MD5:!EXPORT56:!EXP;
    ssl_prefer_server_ciphers on;

    # 301 重定向 http -> https
    if ($scheme = http) {
        return 301 https://$server_name$request_uri;
    }

    location / {
        proxy_pass  http://127.0.0.1:20000; # 反向代理
        # 映射的 frp 服务端 frps.toml 的 vhostHTTPPort 端口
        proxy_set_header X-Forwarded-For $proxy_add_x_forwarded_for;
        proxy_set_header Host $http_host;
        proxy_set_header X-NginX-Proxy true;
        proxy_http_version 1.1;
        proxy_set_header Upgrade $http_upgrade;
        proxy_set_header Connection "upgrade";
        proxy_max_temp_file_size 0;
        proxy_redirect off;
        proxy_read_timeout 240s;
    }
}
frp 配置
配置时间(内网机器、外网机器都要)
sudo timedatectl set-timezone Asia/Shanghai # 中国上海时区,与北京时间保持一致
sudo apt install ntp ntpdate -y # 网络时间协议(NTP)来自动同步系统时间
sudo ntpdate cn.pool.ntp.org # 从中国 NTP 服务器上获取最新的时间,并将系统时间进行更新
sudo hwclock --systohc # 把系统时间同步到硬件时钟中
配置防火墙(外网机器)
# 设置云服务商防火墙!

# 设置防火墙
sudo ufw enable # 启动防火墙,然后按 y
sudo ufw allow 22 # 马上 allow 22 的 ssh,其他的还有:7000、80、443 端口等
sudo ufw allow 7000
sudo ufw allow 80
sudo ufw allow 443
sudo ufw allow 20000 # 为后续的 http 访问开一个端口备用
# 查看
sudo ufw reload # 重启防火墙
sudo ufw status # 查看开放端口,确认都开启
## 测试
sudo apt install nmap -y
nmap 8.219.95.66 -p 20000
下载 frp(内网机器、外网机器都要)
wget https://github.com/fatedier/frp/releases/download/v0.58.0/frp_0.58.0_linux_amd64.tar.gz
tar -xvf frp_0.58.0_linux_amd64.tar.gz
mv frp_0.58.0_linux_amd64 frp
frp toml 配置并初步测试
内网机器上需要配置 frpc.toml。
serverAddr = "xx.xx.xxx.xxx"
serverPort = 7000

[[proxies]]
name = "web"
type = "http"
localPort = 7860
customDomains = ["i4.work"]
外网机器需要配置 frps.toml。
bindPort = 7000
vhostHTTPPort = 20000
测试(别忘记先启动你的服务)。
先 frps:
cd frp
./frps -c ./frps.toml
后 frpc:
cd frp
./frpc -c ./frpc.toml
systemd 设置 frp 持久运行
安装 systemd:
sudo apt install systemd创建写入 frps.service 文件:
sudo vim /etc/systemd/system/frps.service其中 frps 的安装路径需要写绝对路径。可以使用 readlink -f 获取绝对路径。
[Unit]
# 服务名称,可自定义
Description = frp server
After = network.target syslog.target
Wants = network.target

[Service]
Type = simple
# 启动 frps 的命令,需修改为您的 frps 的安装路径
ExecStart = /root/frp/frps -c /root/frp/frps.toml

[Install]
WantedBy = multi-user.target
为 frp 设置权限,以用于 systemd 运行:
chmod +x /root/frp/frps
chmod +x /root/frp/frps.toml
使用 systemd 命令管理 frps 服务:
sudo systemctl start frps # 启动 frp
sudo systemctl stop frps # 停止 frp
sudo systemctl restart frps # 重启 frp
sudo systemctl status frps # 查看 frp 状态
sudo systemctl enable frps # 设置 frp 开机启动
初次使用就启动 frp 并确认 frp 状态,无误后就设置 frp 开机启动。
其他
关于 Nginx 的重定向写法
最简单的:
# Force redirect to https
if ($scheme != "https") {
    return 301 https://$server_name$request_uri;
}

if ($host = 'www.i4.work' ) {
    return 301 $scheme://i4.work$request_uri;
}
不涉及具体域名的:
# www -> none www
if ($host ~* ^www\.(.*)) {
    set $host_without_www $1;
    rewrite ^(.*)$ http://$host_without_www$1 permanent;
}
然后也有像本文前面的 server_name 处就加上 www 的,这样可以省略 www 重定向。
2 条评论
这篇文章写得深入浅出,让我这个小白也看懂了!
谢谢!有人能看的满意我也很开心!୧(๑•̀⌄•́๑)૭